Board and Batten Siding: Sizes, Spacing, and Cost
April 2026Most board and batten problems start on paper. Someone lays out an elevation using 1×10 boards and 1×3 battens, divides the wall neatly, and orders the material. Then the boards arrive measuring 9-1/4 inches instead of 10, every calculated bay is off, and the last one comes up short.
That gap between the nominal size you design with and the actual size that shows up on the truck is where most of the trouble starts, and it is only the first of three things worth getting right before you order.
What Board and Batten Siding Actually Is
Board and batten is a vertical cladding system: wide boards run up the wall with narrow strips, the battens, covering the joints between them. That alternating wide and narrow rhythm gives the profile its depth from the street, and the battens keep water out of the vertical seams.
That last part matters, because the same term now covers two very different things.
Exterior board and batten is a cladding system. The boards and battens are the outer layer, installed over a water-resistive barrier and flashing that do the actual waterproofing. The joint detail still does real work: the batten sheds water away from the seam so the wall behind it stays dry.
Interior board and batten is a trim treatment. Narrow strips applied over drywall or plywood to create a paneled look. It is decorative, and the rules that govern it have nothing to do with shedding water.
Most of what you find searching for board and batten sizes and spacing was written for the interior version. Apply those proportions to a full elevation and the result usually disappoints, because a wall treatment sized for a dining room reads busy across two stories. Keep the two separate as you plan.
Settle one more variable early: individual boards or panels. Traditional board and batten uses separate boards, each set a small distance apart so it can move, with the batten covering that gap. Most fiber cement, engineered wood, and composite versions are instead a four-foot-wide vertical panel with battens applied over the seams, usually at 16 or 24 inches on center so fasteners hit framing. Both are legitimate, but they size, space, and install differently, so know which one your quote is for.
You can also reverse the assembly. The Western Red Cedar Lumber Association notes that battens can go on first with the boards installed over them, which produces a deep channel shadow line instead of a raised one. Useful when you want the vertical rhythm without the proud batten.
For a broader look at where vertical cladding fits against the alternatives, see our guide to choosing vertical or horizontal siding.
Board and Batten Siding Sizes and Dimensions
There is no standard board and batten size. Boards run from nominal 1×6 to 1×12, battens from 1×2 to 1×4, and the combination is a design decision rather than a specification you look up. The Western Red Cedar Lumber Association puts the available range at 1×2 through 1×12 and names a 1×3 batten over a 1×10 board as a frequent starting point. Bear Creek Lumber lands on the same pairing.
The number that trips people up is not the nominal size. It is the actual size.
A 1×10 board is not ten inches wide. Surfacing takes half an inch off nominal stock up to 1×6 and three quarters of an inch off 1×8 and wider, so a nominal 1×3 batten measures 2-1/2 inches and a nominal 1×10 board measures 9-1/4. Design a wall to nominal dimensions and the error compounds with every board, which is exactly how a carefully planned elevation ends up with a sliver of a board in the last bay.
Design in actual widths. Order in nominal ones.
| Nominal size | Actual width, surfaced dry | Actual width, rough sawn dry | Typical use |
|---|---|---|---|
| 1×2 | 1-1/2 in | 1-3/4 in | Narrow batten, traditional proportion |
| 1×3 | 2-1/2 in | 2-3/4 in | Most common batten |
| 1×4 | 3-1/2 in | 3-3/4 in | Wide batten, bolder modern look |
| 1×6 | 5-1/2 in | 5-3/4 in | Narrow board, fine-grain rhythm |
| 1×8 | 7-1/4 in | 7-3/4 in | Board, tighter spacing |
| 1×10 | 9-1/4 in | 9-3/4 in | Most common board |
| 1×12 | 11-1/4 in | 11-3/4 in | Widest common board |
Widths are from the WRCLA size tables. Thickness varies with surfacing and species convention: nominal one-inch cedar runs a full 3/4 inch rough sawn and 11/16 inch once surfaced, so a cedar batten can be slightly thinner than the three-quarters most people assume. Other species and composite products publish their own thicknesses, so take the figure from your supplier rather than from the nominal label. Rough green stock is the outlier on width too, measuring at or very near full nominal, so a rough green 1×10 really is about ten inches and shrinks toward the dry figure as it seasons. Surfaced green stock does not behave that way; it is already close to the dry width. Those actual batten widths, 1-1/2 to 3-1/2 inches, are the same pieces the nominal 1×2 to 1×4 range describes.
You may see a slightly different set quoted, with a 1×10 at 9-3/8 inches rather than 9-1/4. That is the same board at a different moisture content: WRCLA lists 9-1/4 for dry stock and 9-3/8 for green, and the surfacing convention does not change it. Work from your supplier’s own coverage table and confirm whether you are being quoted green or kiln-dried, because across a long wall the difference is enough to shift a bay.
Lengths are the other quiet variable. Wood board and batten is commonly stocked in 8, 10, and 12 foot lengths, so a tall wall picks up a horizontal joint that has to be flashed and that interrupts the vertical line. Some composite products run longer. ACRE sheets and trim are made in lengths from 8 to 20 feet, which on a two-story gable can mean running the full height in one piece.
For reference, ACRE board and batten is built from ACRE sheets in 1/2 inch or 3/4 inch thickness with ACRE trim battens in 1×2, 1×3, 5/4×2, or 5/4×3. The trim follows the same nominal-to-actual convention as lumber, so a 1×3 ACRE batten measures 2-1/2 inches like its wood equivalent and drops into the table above without recalculating.
How to Space Battens on an Exterior Wall
“Should board and batten be 16 or 24 inches?” is the most common spacing question, and it has a frustrating answer: it depends on which system you are building, and for one of them the question does not apply at all.
With individual boards, the board width mostly chooses the spacing for you. Battens land wherever two boards meet, so the on-center spacing is the board’s actual width plus whatever gap you leave. The gap gives you an inch or so of adjustment; the board width sets everything else. Nominal 1×10 boards set 1/2 inch apart put battens at roughly 9-3/4 inches on center. A 1×6 gives you 6 inches, and the widest common board, a 1×12, reaches about 11-3/4, or 12-1/4 if you open the gap to a full inch. Board width and gap together therefore land the commonly stocked sizes somewhere between about 6 and 12-1/2 inches on center at a conventional half-inch gap, which is why traditional board and batten reads at that rhythm. You can push further by opening the gap and widening the batten to cover it: a 1×12 board with a 4-3/4 inch gap and a 1×8 batten gets you to exactly 16 inches on center with about 1-1/4 inches of overlap on each board, all from standard stock. That is a deliberate wide-gap layout rather than the default, and it needs the batten sized for the gap.
With a panel system, spacing is a design choice. Because the battens are applied over a continuous four-foot sheet rather than over joints, you are not tied to the board width. You are still tied to the panel joints, the framing, and the manufacturer’s fastening schedule, but within that you can set the rhythm. This is where 16 and 24 inches come from: they land on standard framing. Check the maximum before you commit to the wider one. Fastening schedules often cap batten spacing, and ACRE’s own installation guide sets that ceiling at 16 inches on center.
Most of the spacing advice online conflates these two, which is why it contradicts itself.
| Batten spacing (o.c.) | How you achieve it | Visual read | Framing note |
|---|---|---|---|
| 6 to 8 in | 1×6 or 1×8 boards, or panels | Traditional and fine-grained; can read busy across a large elevation | Will not align with studs; check what the battens fasten into |
| 9-1/2 to 10 in | 1×10 boards, or panels | The most common board and batten rhythm | Will not align with studs; check what the battens fasten into |
| 11-1/2 to 12-1/2 in | 1×12 boards, or panels | Classic farmhouse proportion | Will not align with studs; check what the battens fasten into |
| 16 in | Panel system, or custom-milled boards | Clean and current, though wider than the traditional proportion | Lands on standard stud framing |
| 24 in | Panel system | Bold and modern; can read flat if the batten is too narrow | Lands on framing, but check the maximum spacing your product allows. Some manufacturers, ACRE included, cap batten spacing at 16 in on center |
One proportion rule is worth carrying into the decision: a batten roughly a quarter to a third of the board’s width. A 2-1/2 inch batten on a 9-1/4 inch board sits right in that band, which is part of why the 1×3 over 1×10 pairing has lasted. Going much wider on spacing to save on battens is what makes an elevation look flat.
That last column is the one to settle before the material is ordered. If your batten spacing does not match the framing module, the battens are not landing on studs, so you need to know what they ARE fastening into. Some systems are approved for attachment to structural sheathing; others require horizontal blocking, girts, or furring behind the cladding. Check the installation instructions for the specific product, because this is where they differ most.
Working out the layout
Do not start at one corner and run until you run out of wall. Divide first.
Measure the wall between the trim, not corner to corner, and subtract anything the siding will not cross. Divide that usable width by your target spacing, round to the nearest whole number of bays, then divide the usable width back by that number. The result is your actual spacing, and every bay across that run comes out identical.
On a 17 foot 3 inch wall, that is 207 inches. Targeting 16 inch centers gives 12.9 bays, so round to 13 and divide back: 207 divided by 13 is 15.92 inches. That holds the spacing within a tenth of an inch of your target and leaves no orphan strip at the end.
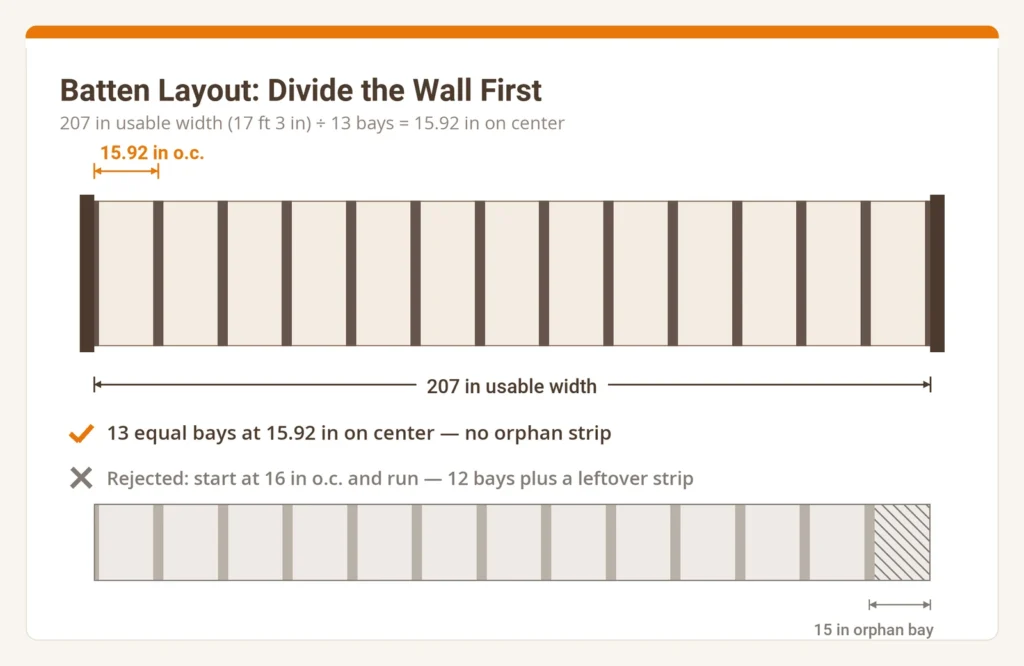
Where you genuinely cannot adjust the spacing, such as with fixed-width boards, apply the rule experienced carpenters use: never let an end board finish narrower than half a full board. Rip two boards down instead and split the difference between both ends, which reads as intentional rather than as a mistake.
Two more judgment calls, and they can pull against the even-bay rule above. Battens that land off-center on a door, a window, or a light fixture will bother you every time you pull into the driveway. When a focal point matters more than a perfectly even run, set the grid off that opening first and absorb the difference at the corners, where nobody reads it. And on a house with walls of different lengths, hold the module constant and let each wall round to its own bay count. Consistent spacing across the whole house matters more than any single wall dividing perfectly.
Board and Batten Siding Materials Compared
Six materials cover almost every board and batten specification. Which one is right depends on your climate, the maintenance you will actually do, and how bold you want the elevation to read. For a closer breakdown of picking between them, see our guide to the best material for board and batten siding.
| Material | Relative installed cost | Maintenance cycle | Dimensional movement | Suits |
|---|---|---|---|---|
| Vinyl | Lowest | Wash only | Moderate, thermal | Tight budgets, low-maintenance priority |
| Metal | Moderate to high | Minimal | Low with moisture, high with temperature | Modern designs, harsh exposure |
| Fiber cement | Moderate to high | Repaint on a long cycle | Very low | Fire-prone regions, long service life |
| Engineered wood | Moderate to high | Repaint, maintain cut edges | Low to moderate | Mid-budget projects wanting a wood look |
| Cedar and natural wood | Highest | Refinish on a regular cycle | High | Authentic wood, drier climates, owners who will maintain it |
| Rice hull composite | Mid | No refinishing cycle for rot protection | Low with moisture, moves with temperature | Wood appearance without the refinishing commitment |
Relative cost is a summary; the installed dollar figures are in the cost section below. The composite figures there are for the generic category. Modern Mill does not publish pricing for ACRE, because distributors and dealers set retail.
Cedar and natural wood is the original and still the benchmark for appearance. It works easily, takes finish well, and its natural oils give real resistance to rot and insects. The trade-off is upkeep and movement: it needs a refinishing cycle to stay protected, and it responds to every seasonal swing in humidity. In a dry inland climate, well maintained, cedar has decades in it. On a coastal wall that never gets refinished, it can start failing inside fifteen years. Our cedar siding maintenance guide covers what the cycle actually involves.
Engineered wood is the value position. It holds a convincing wood grain, resists rot better than untreated solid wood, and costs less than cedar installed. It still wants paint and it still wants its cut edges sealed, so it reduces the maintenance burden rather than removing it.
Fiber cement brings genuine durability, fire resistance, and a painted-wood look that holds for years between repaints, which is why it has become the default on a lot of production housing. Its constraints are all on the jobsite rather than on the wall: it is the heaviest option here, it is brittle until fastened, and cutting it is hard on blades and produces silica dust crews have to manage. None of that shows in the finished elevation. Budget crew time for it.
Vinyl has the lowest entry price of anything here and asks almost nothing of you afterward, though the installed ranges overlap enough that a cheap composite job can land under an expensive vinyl one. Two constraints come with it. It does not take paint well after installation, so the color you choose is largely the color you keep. And because vinyl board and batten is molded as an integrated panel, the batten spacing is fixed by the product. If controlling the proportion is the reason you wanted board and batten, that is the trade.
Metal, properly specified, offers a very long service life with little routine maintenance, and its crisp shadow lines suit contemporary designs particularly well. It carries a cost premium, it moves noticeably with temperature so the detailing has to allow for it, and its durability depends heavily on the coating system and on corrosion-appropriate fasteners.
Rice hull composite is the newest category. ACRE is a rice-hull-based composite made from upcycled rice hulls, resists water, weather, rot, and pests, takes paint and stain without primer, and works with standard woodworking tools rather than specialist blades. The substrate does not depend on a finish to resist rot the way solid wood does, so there is no repainting deadline driven by decay. The trade-off is that it is a temperature-sensitive material rather than a moisture-sensitive one: it expands and contracts with heat, and Modern Mill’s installation guidance treats the finish and its color as part of managing that movement. The coating specification is not optional, and neither is following the gapping schedule.
Board width is a material decision
Here is the connection the material comparisons usually miss. With solid wood, how wide you can go is limited by physics, not by taste. Wide boards cup more and open larger seasonal gaps, which is why experienced installers warn against reaching for 1×12 stock and often recommend narrower boards for a wall that has to look right in year ten. The USDA Forest Products Laboratory’s Wood Handbook documents why: wood shrinks and swells across the grain as its moisture content changes with the seasons, and the wider the piece, the greater the total movement.
Dimensionally stable materials loosen that link: when the board barely moves with the seasons, width stops being the limiting factor. That is why wide-board board and batten is easier to pull off in composite, fiber cement, or metal than in solid lumber. It does not make those materials constraint-free, it moves the constraints somewhere else, usually into thermal movement and the manufacturer’s fastening schedule.
If you are weighing specific pairings, we compare ACRE against cedar, fiber cement, and vinyl in more detail, and our guide to high-performance materials for extreme weather works through the exposure question.
What Board and Batten Siding Costs in 2026
Before any number is useful, one thing has to be settled: siding is priced per square foot of wall area, not per square foot of house.
This is the single biggest source of sticker shock. A 2,000 square foot house does not have 2,000 square feet of wall. Depending on its shape and how many stories it has, it might have 1,600 or it might have 2,600. Homeowners read “$8 per square foot” against their home’s listed size, then get a quote built on a completely different number and assume someone is padding it.
To estimate your own wall area, add up the length of each exterior wall, multiply by the wall height, then add roughly 10 to 15 percent for gables and subtract the large openings. It is rough, but it is the right unit.
Board and batten runs about $5 to $13 per square foot of wall installed. Hover puts the profile in that range across materials. Published ranges vary widely between sources, and the floor of any of them assumes the cheapest material, the simplest wall and the cheapest labor market. Almost nobody’s project is all three, so plan nearer the middle than the bottom.
As a cross-check on those published ranges, Homewyse’s January 2026 unit-cost estimate prices a 500 square foot builder-grade job at $3,765.71 to $5,802.96 across material, labor, supplies, and tools. Divide that by the 500 square feet of wall it covers and you get roughly $7.50 to $11.60 per square foot, which sits inside the published span and toward its middle. Homewyse is worth checking against because it is vendor-neutral, it states its basis plainly as exterior surface area, and it itemizes what a per-square-foot figure leaves out.
Treat national averages with suspicion. Cost pages get re-priced and partially updated, so a headline figure and the table underneath it can drift apart on the same page, and the round numbers that circulate in AI summaries are often the older ones. Your regional quote is the better guide than any national figure, including the ones above.
Material choice moves the number more than anything else.
| Siding material | Installed cost per sq ft of wall |
|---|---|
| Vinyl | $4 to $12 |
| Composite | $5 to $10 |
| Aluminum | $6 to $10 |
| Fiber cement | $6 to $15 |
| Engineered wood | $7 to $12 |
| Steel | $7 to $16 |
| Wood | $2.25 to $15 |
Installed per-material ranges from Hover’s 2026 siding cost breakdown. Wood’s range is the widest on the list because it covers everything from construction-grade pine to clear cedar, and the upper end is where siding-grade cedar actually sits. A siding contractor interviewed by This Old House put the ordering plainly: “Wood’s going to be the most expensive right now, and then vinyl is going to be the cheapest.”
The ordering is the reliable part of that table; the exact number is not. Read across it and the per-material spread runs wider than the $5 to $13 figure quoted for the profile above, because that headline is a mid-market average and these rows include both the cheapest and the most expensive versions of each material. The ranges also overlap heavily, so the low end of an expensive material and the high end of a cheap one sit closer than the usual framing suggests. Where you land depends on your local labor market and how complicated your walls are, and that variable is larger than the gap between two adjacent materials.
What that number does not include
The gap between an online estimate and a real quote is usually not markup. It is scope. Homewyse’s own exclusions list is the clearest account of what sits outside a per-square-foot figure:
- General contractor overhead and markup, which adds 13 to 22 percent if a GC is supervising the work.
- Tear-off and disposal of the existing siding.
- Permits and inspection fees, which most jurisdictions require for a siding replacement.
- Sales tax on materials and supplies.
- Sheathing or framing repair discovered once the old siding is off, which nobody can price in advance.
- Hazardous material testing on older homes.
Only one of those is quantified in advance: the contractor markup, at 13 to 22 percent on top of everything else. The rest depend on your house, and tear-off, permits and any sheathing repair found behind the old siding all sit above that. It is worth asking a contractor to itemize rather than assuming the number is inflated.
Why board and batten costs more than horizontal siding
Homeowners are routinely told board and batten “costs double” without any explanation, which makes the premium impossible to evaluate. The extra money goes to four specific things:
Layout time. Horizontal siding courses off a level line. Board and batten has to be set out across the whole elevation before the first piece goes up, and held consistent around corners and openings.
Blocking or furring. Vertical cladding often needs horizontal nailing behind it, an added framing operation horizontal siding does not require. Some panel systems are approved for direct attachment, so this one depends on the product.
More fastening. Every board and every batten is a separate vertical run, so the linear feet of fastening runs considerably higher than the same wall in a horizontal profile.
More terminations. Corners, window surrounds, and the bottom edge each need trim and flashing detail that takes longer on a vertical assembly.
Two smaller budget items are worth planning for. Order more material than your measured wall area: Homewyse’s estimate buys 534 square feet of material to clad a 500 square foot wall, and that spare is what absorbs the vertical cuts and the batten runs. And on the labor question, published guides often say labor is about a third of the total; the underlying line-item data puts it nearer 19 to 28 percent before contractor markup, with the share rising on complex facades and multi-story work. Ask what your quote assumes rather than working from a rule of thumb.
The Installation Details That Decide Whether It Lasts
Board and batten fails in predictable ways, and nearly all of them trace back to the same cause: the assembly was not allowed to move.
Fasten each board through its middle, not its edges. Bear Creek Lumber specifies one nail per bearing through the center of boards up to 6 inches wide, and on boards 8 inches and wider two nails per bearing about 3 inches apart, straddling the centerline. Either way the fasteners stay in the middle third of the board, so the wood can expand and contract toward both edges. Nailing near both edges pins the board across its full width, and a board that cannot move will split instead.
Drive the batten nail through the gap, not through the boards. This is the detail that separates a wall that lasts from one that starts popping fasteners in year two. The batten fastener should pass between the two board edges it covers and land in the sheathing or blocking behind. If it goes through the boards, the batten locks them together, and the next seasonal cycle works the nails loose or splits the wood.
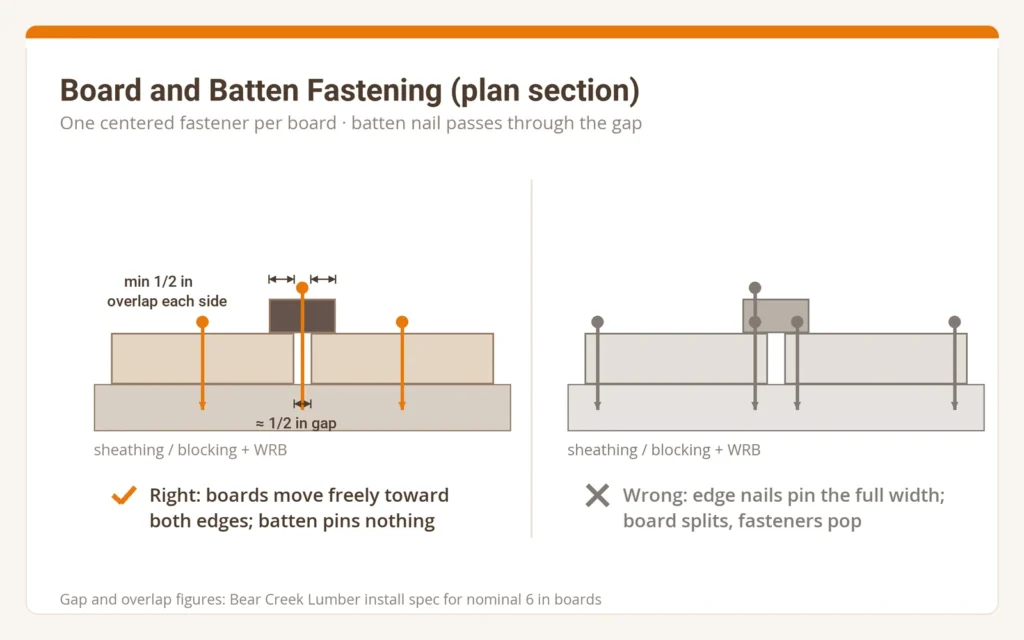
Leave a gap between boards, and cover it properly. Solid wood boards go up spaced apart rather than tight, typically around half an inch, so they have somewhere to move; butting them tight is what produces the ugly gaps people report a season later. The batten then has to be wide enough to bridge that gap and still land on solid board either side. Bear Creek’s figure is a minimum half inch of overlap onto each board for nominal 6 inch boards at a half inch gap, and more as boards get wider. Rather than scaling that by eye, take the overlap from your supplier’s or manufacturer’s schedule for the board width you have chosen. That overlap is what actually sheds water at the joint.
Think hard before sealing the batten seams on a traditional wood assembly. The instinct is to caulk them, and this is a genuine split among professionals rather than a settled rule. The case against: wood board and batten is a drained, vented assembly, the batten sheds water by lapping the joint, and the wall needs to dry outward, so sealing those seams can trap moisture behind the cladding and push the paint film off when it warms. The case for: some experienced builders do caulk both sides of every batten, and several manufactured systems list a caulked joint as an approved detail. Panel systems are a different question, and some manufacturers do specify sealant or a particular joint treatment at seams and terminations. Flash first, seal only where the installation instructions for your specific product call for it, and never close off an opening the system relies on for drainage. Some manufacturers, Modern Mill included, specifically require the gap above a window to be left uncaulked so water can drain out of it. On this detail, follow the manufacturer over any general rule, including this one.
Run furring horizontally or diagonally. Because the cladding runs vertically, the strapping behind it has to run the other way. The common objection is that horizontal furring dams water, and the answer is a furring layout that lets water drain past it, either purpose-made vented furring or an approved cross-batten detail, with a screened opening at the bottom to let air in and keep insects out. Do not improvise this by notching ordinary strapping on site, because it is also structural and it is carrying your fasteners.
Protect the bottom edge. Most real-world failures start there, where roof runoff and splashback hit the siding repeatedly. Keep clearance from soil and from hard surfaces, detail a drip at the bottom, and treat every field-cut edge the way that material requires: on wood and engineered wood that means priming or sealing, on other systems it may mean a specific edge treatment or none at all. Cut edges on absorbent materials wick water faster than anything else on the wall and are routinely left bare.
Use corrosion-resistant fasteners throughout. Hot-dipped galvanized, aluminum and stainless are the usual options, but they are not interchangeable: coastal exposure often calls for stainless, and some claddings and treated lumber are incompatible with aluminum. Take the fastener material, type and required penetration from the cladding manufacturer. Uncoated fasteners stain the siding and fail early.
Everything above is the traditional solid-wood assembly. Composite, fiber cement, engineered wood and panel systems share the underlying principle, which is that the cladding has to be able to move, but they do not share the numbers. Gaps, fastener types, penetration depths and coating requirements are product-specific, and for most manufacturers, including Modern Mill, following the current installation guide is a condition of the warranty. Read that guide before the first piece goes up. Our article on preventing composites from warping covers why the movement rules differ, and our shiplap siding materials comparison covers the same ground for the horizontal profile. If overall lifespan is the deciding factor, our roundup of the longest-lasting siding options compares this material against the rest.
Choosing Sizes and Material for Your Project
Work through it in this order and the decisions stop competing with each other. Start with exposure, because coastal, wet, and freeze-thaw climates punish materials that absorb moisture, and that narrows the list before aesthetics enter. Then decide what maintenance you will genuinely do, since a refinishing cycle you skip is worse than one you never signed up for. Then set the proportion: pick board and batten widths together, check the pairing against the spacing table above, and confirm whether your spacing needs blocking behind it. If you are weighing the look as much as the spec, our piece on modern aesthetic performance with board and batten siding goes deeper on that side of the decision.
For projects that want the look and feel of real wood without a refinishing cycle, ACRE is worth a look. It cuts, mills, and fastens with standard woodworking tools rather than specialist blades, and, installed to Modern Mill’s gapping and fastening requirements, its dimensional stability keeps wide boards flat, which leaves a bolder proportion on the table. It takes paint and stain without primer, or arrives factory-finished in seven colors, and it is made from upcycled rice hulls in McComb, Mississippi. One constraint travels with that flexibility: because ACRE contains PVC, Modern Mill requires coatings with a light reflective value of 55 or greater, so very dark colors need to be cleared with them first. That is a heat-management rule rather than an aesthetic one, and most exterior palettes sit comfortably inside it.
On warranty, be precise about what any manufacturer is offering. ACRE carries a lifetime limited warranty against material defects resulting from the manufacturing process, including rot or splintering caused by that process. Ordinary weathering, including the gradual color change every exterior material undergoes under ultraviolet light, sits outside that warranty, as it does with essentially all cladding. Resistance to water, weather, rot, and pests is a performance characteristic of the material rather than a warranty term, and it is worth reading any manufacturer’s document closely enough to know which is which.
Ready to specify it? Start with the ACRE board and batten profile, or request a sample to see the grain and finish on your own project.
Ready to Experience the
Difference?
Ask for ACRE at your local lumber yard or order samples to see for yourself why builders are making the switch.
Frequently Asked Questions
What size boards and battens are used for board and batten siding?
Boards are commonly nominal 1×8, 1×10, or 1×12, and battens nominal 1×2, 1×3, or 1×4, with a 1×3 batten over a 1×10 board the most frequently cited pairing. The full available range is 1×2 through 1×12. Remember that these are nominal sizes: a 1×10 board actually measures 9-1/4 inches and a 1×3 batten 2-1/2 inches.
Should board and batten be 16 or 24 inches apart?
Board and batten battens are spaced 16 or 24 inches on center only on panel systems; with individual boards the spacing is set by the board width plus the gap, which lands at roughly 6 to 12-1/2 inches on center. That is also the answer to the related 12-versus-16 question: 12 inches is achievable with individual 1×12 boards and is the traditional farmhouse rhythm, while 16 inches effectively requires a panel system, unless you have boards custom-milled, and reads cleaner across a large elevation. On four-foot panels, 16 and 24 inches are the usual choices because they land on standard framing, and both are wider than the traditional proportion. Confirm the maximum your product allows before choosing 24: ACRE, for one, caps batten spacing at 16 inches on center.
What is the formula for board and batten spacing?
Divide the usable wall width, measured between the trim rather than corner to corner, by your target spacing, round to the nearest whole number of bays, then divide that width by the bay count to get your actual spacing. A 207 inch wall at a 16 inch target gives 12.9, rounds to 13 bays, and produces 15.92 inch centers with no leftover strip at the end.
How much does board and batten siding cost for a 2,000 square foot house?
The question needs one correction before it can be answered: siding is priced per square foot of wall area, not house size, and a 2,000 square foot house rarely has 2,000 square feet of wall. Measure the walls first, then multiply that figure by the installed range above. A quote built on your actual wall area is the only one worth comparing, and it still sits before contractor markup, tear-off, and permits.
What are the disadvantages of board and batten siding?
It costs more to install than horizontal siding in the same material, because of layout time, blocking, the greater length of fastening, and more trim at the terminations. It is less forgiving of installation mistakes, since the fastening pattern determines whether boards split. And in solid wood, board width is limited by cupping and seasonal movement. Against that, it delivers a depth and vertical scale horizontal siding cannot, suits both traditional and modern architecture, and a dimensionally stable material removes the cupping constraint specifically.
How long does board and batten siding last?
It depends far more on the material, the climate, and the detailing than on the profile. This Old House puts board and batten at 20 to 30 years with proper maintenance. Metal and fiber cement generally outlast wood, and any material lasts longer on a dry inland wall than on a coastal one. In practice the bottom-edge detail and whether the maintenance actually gets done matter more than the material’s rated life, because most failures start where water repeatedly hits the wall rather than from the material simply wearing out.
Can you install board and batten siding over existing siding?
Sometimes, but it is rarely the right call. The existing surface has to be flat, sound, and able to hold fasteners, and you still need horizontal furring for the boards to attach to. The larger problem is that going over old siding hides whatever is happening underneath, and the sheathing and water barrier are exactly what a re-side should expose. Tearing off costs more up front and is usually cheaper over the life of the wall.